The Papilio Loader
The Papilio Loader is a new multi-platform application that will make using Papilio FPGA boards a whole lot easier. Technically, it is merely a GUI frontend over the regular tools but is also a big improvement over scripts and batch files. It runs on both Windows and Linux and uses command line tools from various sources.
THE PAPILIO LOADER SOFTWARE IS PROVIDED TO YOU "AS IS," AND WE MAKE NO EXPRESS OR IMPLIED WARRANTIES WHATSOEVER WITH RESPECT TO ITS FUNCTIONALITY, OPERABILITY, OR USE, INCLUDING, WITHOUT LIMITATION, ANY IMPLIED WARRANTIES OF MERCHANTABILITY, FITNESS FOR A PARTICULAR PURPOSE, OR INFRINGEMENT. WE EXPRESSLY DISCLAIM ANY LIABILITY WHATSOEVER FOR ANY DIRECT, INDIRECT, CONSEQUENTIAL, INCIDENTAL OR SPECIAL DAMAGES, INCLUDING, WITHOUT LIMITATION, LOST REVENUES, LOST PROFITS, LOSSES RESULTING FROM BUSINESS INTERRUPTION OR LOSS OF DATA, REGARDLESS OF THE FORM OF ACTION OR LEGAL THEORY UNDER WHICH THE LIABILITY MAY BE ASSERTED, EVEN IF ADVISED OF THE POSSIBILITY OR LIKELIHOOD OF SUCH DAMAGES.
By downloading the software from this page, you agree to the specified terms.
Quick Links
Requirements
Windows XP SP2 and above or Linux Kernel 2.2 and above
JRE (Java Runtime Environment) v1.6
FTDI drivers
Installation
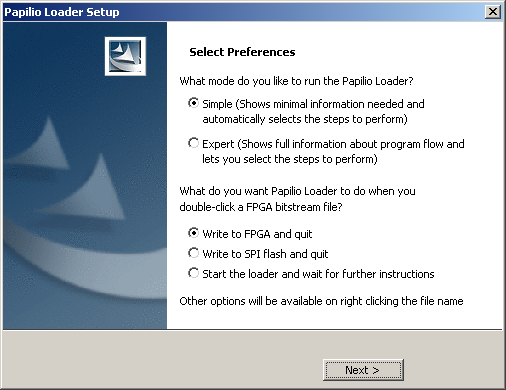
Install JRE 1.6 and FTDI D2XX drivers (both available freely) before running the Papilio Loader installer. Papilio Loader installation is simple and quick. You can select some key operating parameters for the Papilio Loader on the following screen:

First option is whether you wish to run the application in simple or expert mode, and the other option is how does the application respond to double clicking an associated file. These options can be changed anytime with the File->Preferences dialog box.
Getting Started
The FPGA device on the Papilio boards needs to be programmed with bitstream in order to work. A bitstream is basically a series of bits that configures internal programmable fabric of the FPGA creating the hardware components you designed. This apparently simple task involves a number of steps under the hood, especially if you are using a microcontroller core in the bitstream.
Interface
The interface used to send this bitstream to the FPGA is JTAG, which is implemented using channel A of dual channel USB to serial converter device FT2232D mounted on each Papilio FPGA board. A standard 5-pin mini USB female to B-type male cable will work.
Input Files
Most of the times you will have a bitstream with a embedded controller with empty program memory, exactly like a factory fresh unprogrammed microcontroller you buy from the store. You need to program it with your application firmware before you can actually make use of it, which is usually done by special programming tools. For a soft processor which exists inside a computer file, you "merge" your application firmware into the bitstream before sending it over to the FPGA so that you get a microcontroller inside the FPGA running your application. You need three files for this:
- The main .bit file: This is the bitstream containing the unprogrammed soft-processor.
- The .bmm file: This is "Block Memory Map" file that describes the layout of the processor's memory in the .bit file mentioned above. This file is automatically generated by the FPGA synthesis tools, in our case the Xilinx ISE.
- The .hex (or .elf) file: This is your application firmware generated by your favorite IDE and compiler toolchain.
The .hex file is converted to a format compatible with the .bit file and then merged into it with the help of the .bmm file.
If you have a pre-programmed bitstream or your design does not need a program, you can skip the conversion and merger step and just write it to the FPGA.
Target
When you have a bitstream to write, you can either write to the FPGA, to its SPI Flash configuration memory or to a disk file.
To FPGA: The bitstream goes into the FPGA's on-chip configuration RAM and implements your design. This transfer is fast but is lost on power off. This is useful when you are developing a module and need to frequently reprogram the FPGA for testing or debugging.
To: SPI Flash: Since FPGA cannot permanently store its configuration, it needs some external storage for it which it can load automatically on bootup. We use a serial SPI flash EEPROM to store the FPGA configuration. This SPI flash memory is not directly accessible to the programmer, so we first load a small core that links JTAG pins to I/O pins connected to the memory. Then the programmer can write the bitstream to it. It takes some time as serial memories are slower. You can write your finished module into SPI flash so that it can start by itself without tethered to the PC.
To disk file: Sometimes you have a soft procesor code and some program for that processor you need to distribute. Instead of having users compile that program, merge it into the soft processor bitstream and write to the FPGA, you can simply provide them preprogrammed bitstream that they can directly write into the FPGA or its SPI flash configuration memory. With this option you can create such bitstreams ready for distribution.
The Java GUI frontend
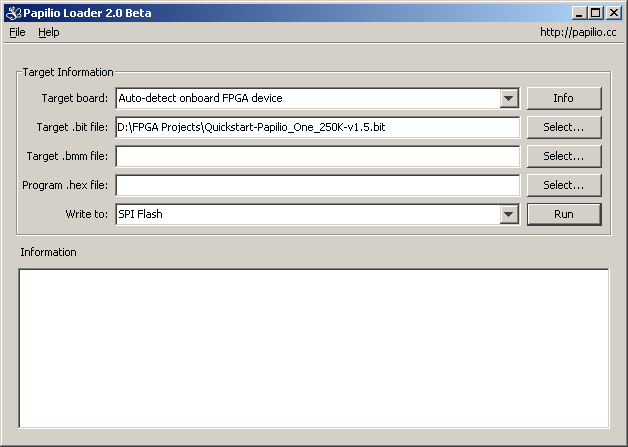
The Papilio Loader is a simple graphical shell that uses different command line utilities to perform the task of programming a FPGA board. It makes working with FPGA boards, like Papilio boards a whole lot easier. The user can simply specify the input files and this application automatically composes command lines for each application and runs them in appropriate order. It works in one of the two modes:
Simple mode: It shows minimum information needed to merge application firmware or write bitstreams to the selected target.
Expert mode: It displays the steps taken by the appliction to perform the specified task. The user has control over which steps to enable or disable to speed up the operation.

Simple mode screen: No operation panel

Expert mode screen: Operation panel to customize the process
The Work Flow
The Papilio Loader tries to automate the operation as much as possible by automatically selecting the operations to do as per the available information and attempting to find any support files required. Thus when a .bit file is selected, it automatically looks for its companion .bmm file and populates its text box if it finds one. Existence of a .bmm file is a reminder that the .bit file it belongs with, could be a empty soft-processor and may need some application code to work.
File associations and default action on double click
The application supports a number of command line switches and their combinations, out of which one can be selected to be the default action on double clicking a file associated with Papilio Loader. Three options are offered:
- Set the bitfile and its associated .bmm file into appropriate text boxes and wait for further input
- Load the specified bitfile into the FPGA and quit
- Write the specified bitfile into the FPGA's SPI flash configuration memory and quit
Command line format
The Papilio Loader application supports following command line format which can be used to create handy batch files or scripts for frequent use:
papilio-loader.exe [bitfile] [hexfile] [-d|-s|-f] [-q] [-x]
If no command line arguments are supplied the application waits for inputs from the user.
[bitfile] This is the bitstream that is to be written to the target.
[hexfile] This is the user application hex file that should be merged with the bitstream before writing it to the target. If this file is specified, the bitfile must have a companion BMM file else the application will issue an error.
The target can be specified as either 'd' (disk file), 's' (SPI flash) or 'f' (FPGA) or none to have the application load other files and wait for user input.
The 'q' switch instructs the application to do the specified task immediately without waiting for any further inputs from the user.
The application can be instructed to exit once the specified operations are done with the 'x' switch. This switch is valid only if the 'q' switch is specified.
If any error occurs when 'q' and 'x' both are specified, the application does not exit and reports the error.
Examples
papilio-loader.exepapilio-loader.exe [bitfile]papilio-loader.exe [bitfile] -fpapilio-loader.exe [bitfile] -f -q -xpapilio-loader.exe [bitfile] [hexfile]papilio-loader.exe [bitfile] [hexfile] -spapilio-loader.exe [bitfile] [hexfile] -s -q -x
Support
Help is always available with the option Help->Papilio Loader Help (or pressing F1) in the application
For any queries, bug reports or feature requests please make a post on Papilio Loader forum
